
Revision Notes for Class 10 IT (402) – Chapter 1 Digital Documentation (Advanced)
Are you looking for Revision notes of 10 IT (402) – Chapter 1 Digital Documentation (Advanced)? You are at the right place. All the Extra Questions, Revision Notes, MCQs are available here. All the study materials are completely FREE.
Create and Apply Style in the Document
Style refers to a pre-defined set of formatting attributes that can be applied to text, paragraphs, pages, and other elements of a document. Styles help to ensure consistency in formatting throughout the document and make it easier to manage and modify the document’s formatting.
![Digital Documentation Advanced 01]() Advantages of Style
Advantages of Style
 Advantages of Style
- Provides consistency throughout the document
- Saves time and increases efficiency
- Allows for easy updates and modifications
- Makes document management simpler and more organized
- Enhances accessibility for readers who use assistive technologies.
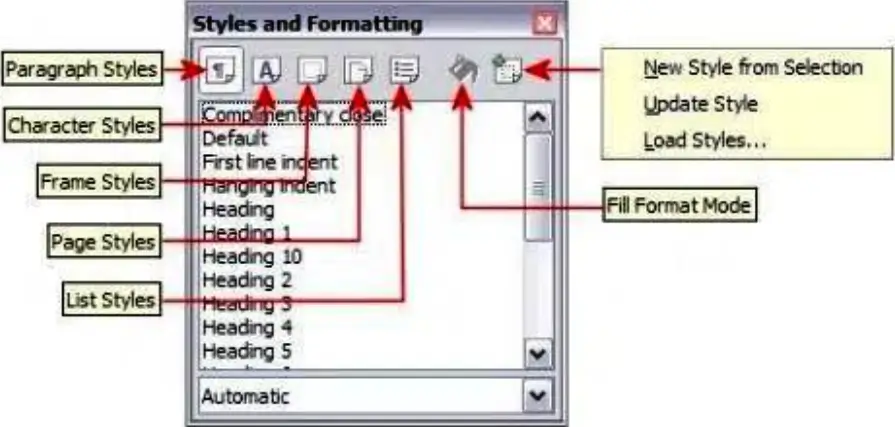
There are several types of styles in OpenOffice, including:
- Character styles: These are used to apply formatting to specific characters or words within a paragraph. For example, you might use a character style to make a particular word bold or italicized.
- Paragraph styles: These are used to apply formatting to entire paragraphs, including text alignment, spacing, and indentation.
- Page styles: These are used to define the layout and formatting of individual pages, including margins, headers, and footers.
- List styles: These are used to define the formatting of bulleted or numbered lists.
- Frame styles: These are used to define the formatting of frames, which are used to hold graphics or other elements within a document.
- Table styles: These are used to define the formatting of tables, including cell borders, backgrounds, and text alignment.
- Graphics styles: These are used to define the formatting of graphics or images within a document, including borders, backgrounds, and text wrapping.
How to Apply Style in OpenOffice.org
Step 1 : Select the text, paragraph, or other element where you want to apply the style.
Step 2 : Click Format > Style and Formatting or press F11
Step 3 : Select any one of the style (e.g., Paragraph, Character, etc.)
What is Fill Format Mode and How to apply
Fill Format Mode is a feature in OpenOffice that allows you to copy the formatting from one element of a document and apply it to another element. This can be useful when you want to quickly apply consistent formatting to multiple elements within a document.
How to Apply Fill Format Mode
Step 1 : Select the element that contains the formatting you want to copy.
Step 2 : Click on the “Fill Format mode” icon in the Style and Formatting window.
Step 3 : Select the element or elements that you want to apply the formatting to.
Step 4 : Click on the element that you want to apply the formatting.

Creating New Custom Style in OpenOffice.org
There are two diffierent ways to create a Style
- Creating a new Style from a selection
- Dragging and Dropping to Create A Style
Create New Style from Selection
By replicating an existing manual format, you can make a new style. This new style will only be applied to this document and will not be saved in the template.
Step 1 : Select the formatted text or paragraph.
Step 2 : From the top menu, select “Styles” > “New Style” (or press F11).
Step 3 : In the New Style window, enter a name for the new style and select the type of style you want to create.
Step 4 : Make any additional changes to the style options.
Step 5 : Click “OK” to save the new style.
Drag and Drop to create New Style
You can drag and drop a text selection into the Styles and Formatting window to create a new style.
Step 1 : Open the Styles and Formatting window.
Step 2 : Select text and drag it to the Styles and Formatting window.
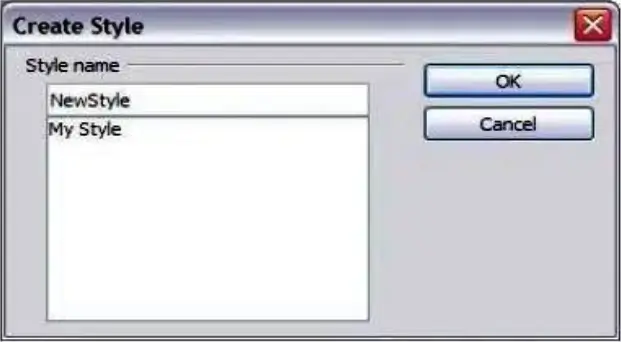
Step 3 : In the Create Style dialog box, type a name for the new style. The list shows the names of existing custom styles of the selected type, if any. Click OK to save the new style.
Step 4 : If the Paragraph Styles list is showing in the Styles and Formatting window, a new paragraph style will be added to the list. If Character Styles are active, the character style will be added to the list.
Modifying Custom or Pre defined Styles
There are two different ways to modify Style in OpenOffice –
- Updating a style from a selection •
- Load or copy styles from another document or template
Updating a Style from a selection
To update a style from a selection:
Step 1 : Open the Styles and Formatting window.
Step 2 : In the document, select an item that has the format.
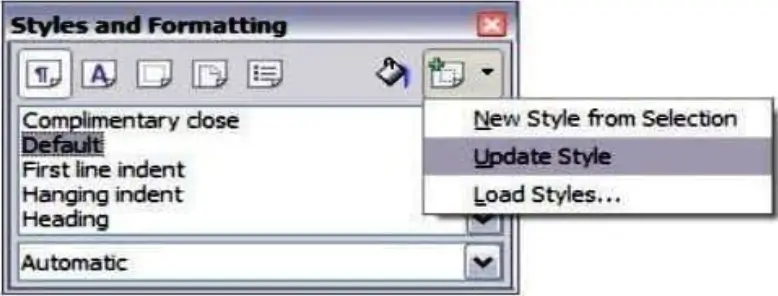
Step 3 : In the Styles and Formatting window, select the style you want to update (singleclick, not double-click), then long-click on the arrow next to the New Style from Selection icon and click on Update Style.
Load or copy styles from another document or template
You can copy styles by loading them from a template or another document:
Step 1 : Open the document into which you wish to paste styles.
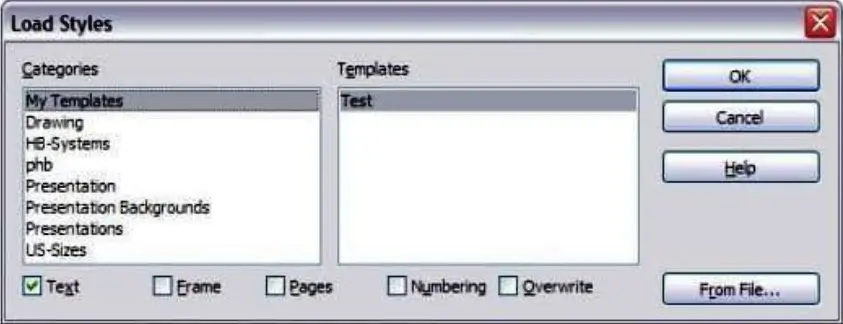
Step 2 : Long-click on the arrow next to the New Style from Selection symbol in the Styles and Formatting window, and then select Load Styles.
Step 3 : Locate and choose the template you wish to copy styles from on the Load Styles box.
Step 4 : Decide which style categories should be duplicated.
Step 5 : Click OK to copy the styles.
How to Insert and use Image in Digital Document
There are various ways to insert images into a document, including via the Drag and Drop, Insert Image from File, Insert Image from Clipboard, Open Office Gallery, and a scanner.
- Drag and Drop
- Insert Image from Dialog Box
- Insert Image from Clipboard
- Insert Image from Gallery
- Insert Image from Scanner
Drag and Drop
To drag an image file into a digital document, follow these steps: –
Step 1 : Open a File browser window and locate the image you want to insert.
Step 2 : Drag the image into the Writer document and drop it where you want.
Insert Image from Dialog Box
To insert an image file into a digital document, follow these steps –
Step 1: Click in the Open Office document in the first step to place the image there.
Step 2: From the menu bar, select Insert > Picture > From File.
Step 3: Navigate to the file that needs to be inserted on the Insert Picture dialogue, select it, and click Open.
Insert Image from Clipboard
Step 1 : Open the document in which you want to insert the image.
Step 2 : Place the cursor where you want the image to be inserted.
Step 3 : Press “Ctrl+V” or right-click and select “Paste” to insert the image from the clipboard.
Step 4 : Resize or move the image as necessary.
Insert Image from Gallery
Step 1 : Open the document in which you want to insert the image.
Step 2 : From the top menu, select “View” > “Gallery” (or press F6).
Step 3 : In the Gallery window that appears, browse through the categories to find the image you want to insert.
Step 4 : Click on the image to select it.
Step 5 : Click and drag the selected image into the document where you want it to appear.
Insert Image from Scanner
If your computer has a scanner attached, Open Office may access the scanning software and enter the scanned item as an image into the Open Office document.
To insert image
Click the area where the image to be placed, then choose Insert > Picture > Scan > Select Source to begin the process.
Modifying Image in OpenOffice.org
You might need to edit a new image you include so that it matches the document. Here, we’ll go through how to use the Picture toolbar, as well as how to resize, crop, and rotate a photo using a workaround.
Picture Toolbar
The Picture toolbar displays when you insert a picture or choose one that is already in the page. View > Toolbars > Picture allows you to set it to always be visible.
Graphics mode
You can change color images to grayscale by selecting the image and then selecting Grayscale from the Graphics mode list.
Flip vertically or horizontally
Select the image, then click the corresponding icon to turn it vertically or horizontally.
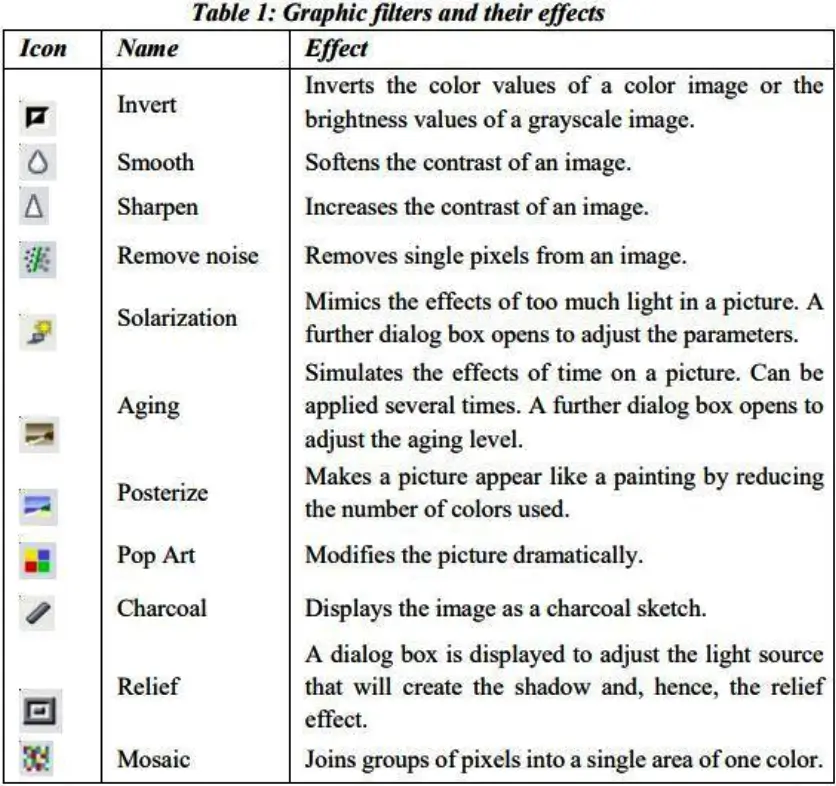
Filters
The filters are briefly described in the following table, but the best way to comprehend them is to use them. Try around with the various filters and their settings.
Transparency
To make a picture more transparent, change the percentage value in the Transparency box on the Picture toolbar. When making a watermark or enclosing the image in the background.
Using The Formatting Toolbar And Picture Dialog
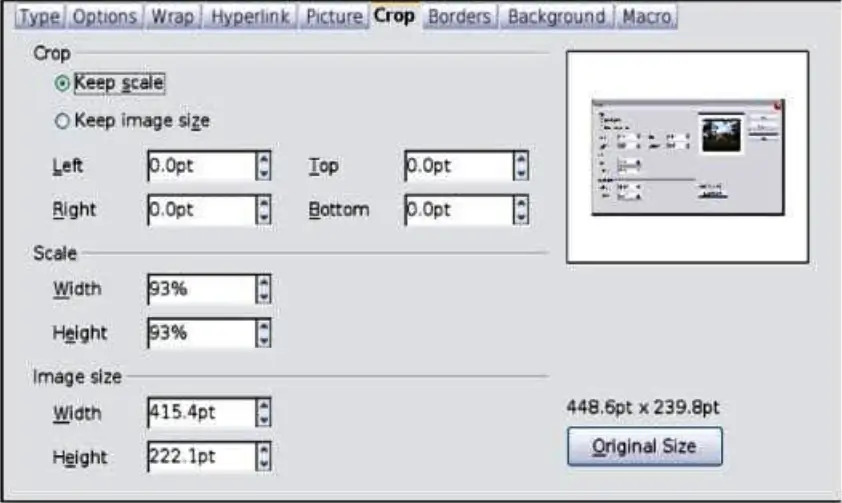
- Cropping Images: You could want to crop (cut off) a portion of the image if you’re only interested in it for your document. Right-click the image and choose Picture from the pop-up menu to begin cropping it.
- Keep scale / Keep image size: When the Keep scale option is used (the default), cropping an image does not alter its scale. When the option to Keep Picture Size is used, cropping results in either an increase in image size (for positive cropping values), a decrease in image size (for negative cropping values), or an image distortion.
- Width and Height: As you input values in the Left, Right, Top, and Bottom fields under Scale or Image size, the Width and Height fields change. To find the precise amount to crop by, use the thumbnail next to these fields.
- Resizing an Image: If the inserted image is too big or too small, it might not fit into the paper completely. You can resize the image in Writer.
- Rotating a Picture: With the aid of the rotation option in digital documentation, you can rotate the image.
- Creating Drawing Objects: Display the Drawing toolbar by selecting View > Toolbars > Drawing to start utilising the drawing tools.
Create and Use Template
A template is a sample that you can follow while writing new documents. Documents that have previously been designed are called templates. Simply substitute your own text for the sample text.
Creating a Template
You can create your own templates in two ways:
- from a document,
- and using a wizard.
Creating A Template From A Document
Step 1 : Open a new or existing document of the type you want to make into a template (text document, spreadsheet, drawing, presentation).
Step 2 : Add the content and styles that you want.
Step 3 : From the main menu, choose: File > Templates > Save.

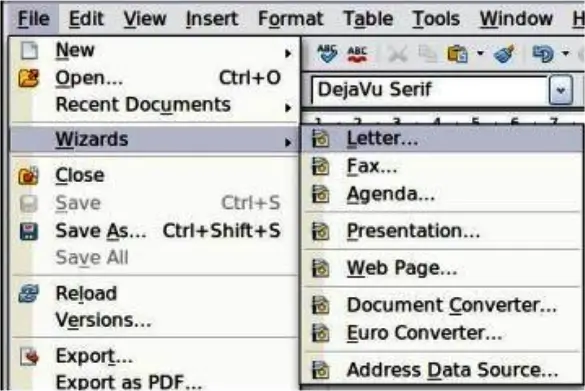
Creating A Template Using A Wizard
Step 1 : Choose File > Wizards >[type of template required]
Step 2 : Follow the instructions on the pages of the wizard like the date, subject line , salutation, and complimentary close
Step 3 : In the last section of the wizard, you can specify the name and location for saving the template.
Step 4 : Finally, you have the option of creating a new document from your template immediately, or manually changing the template.
Create and Customize Table of Contents
A table of contents (TOC) is a list of the main sections or chapters in a document, a table of contents gives readers a quick summary of the document’s content and a mechanism to quickly search for a specific piece of information within it. The table of contents typically includes section or chapter titles and the corresponding page numbers.
Advantages of Table of Content
- Provides quick navigation
- Efficient organization
- Improved comprehension
- Professional appearance
- Accessibility for readers with disabilities
What is the purpose of Table of Content
- It provides users with a summary of the contents and structure of the document.
- It enables users to jump right to a certain area of a document.
How to Insert Table of Content in Digital Documentation
To insert table of Content in Digital Document follow the following link –
Insert > Indexes and Tables > Indexes and Tables.

Basic Setting in Table of Content
Adding A Title
Put a title in the Title area if you want one for the table of contents. (If Writer automatically entered a title in this field, you may edit it by typing over the value.) Clear the Title field to remove the title.
Protecting Against Manual Changes
Select the Protected against manual changes checkbox to prevent accidental changes to the table of contents.
- If this box is checked, the context menu or the Insert Table/Index window are the only ways to modify the table of contents.
- If this box is unchecked, The table of contents can be modified immediately on the document page, just like regular text..
Changing The Number Of Levels
When creating the table of contents, Writer by default considers 10 levels of headings. Enter the required number in the “Evaluate up to level” spin box to adjust the number of levels examined.
Assigning Custom Styles
All paragraphs created using the default heading styles are automatically assigned to the table of contents by Writer (Heading 1, Heading 2, and so on).
Using The Entries Tab
Entries table help to customize the formatting of the TOC entries. This tab allows you to specify how the headings and subheadings in the document should appear in the TOC, including the font, style, indentation, and page number formatting.
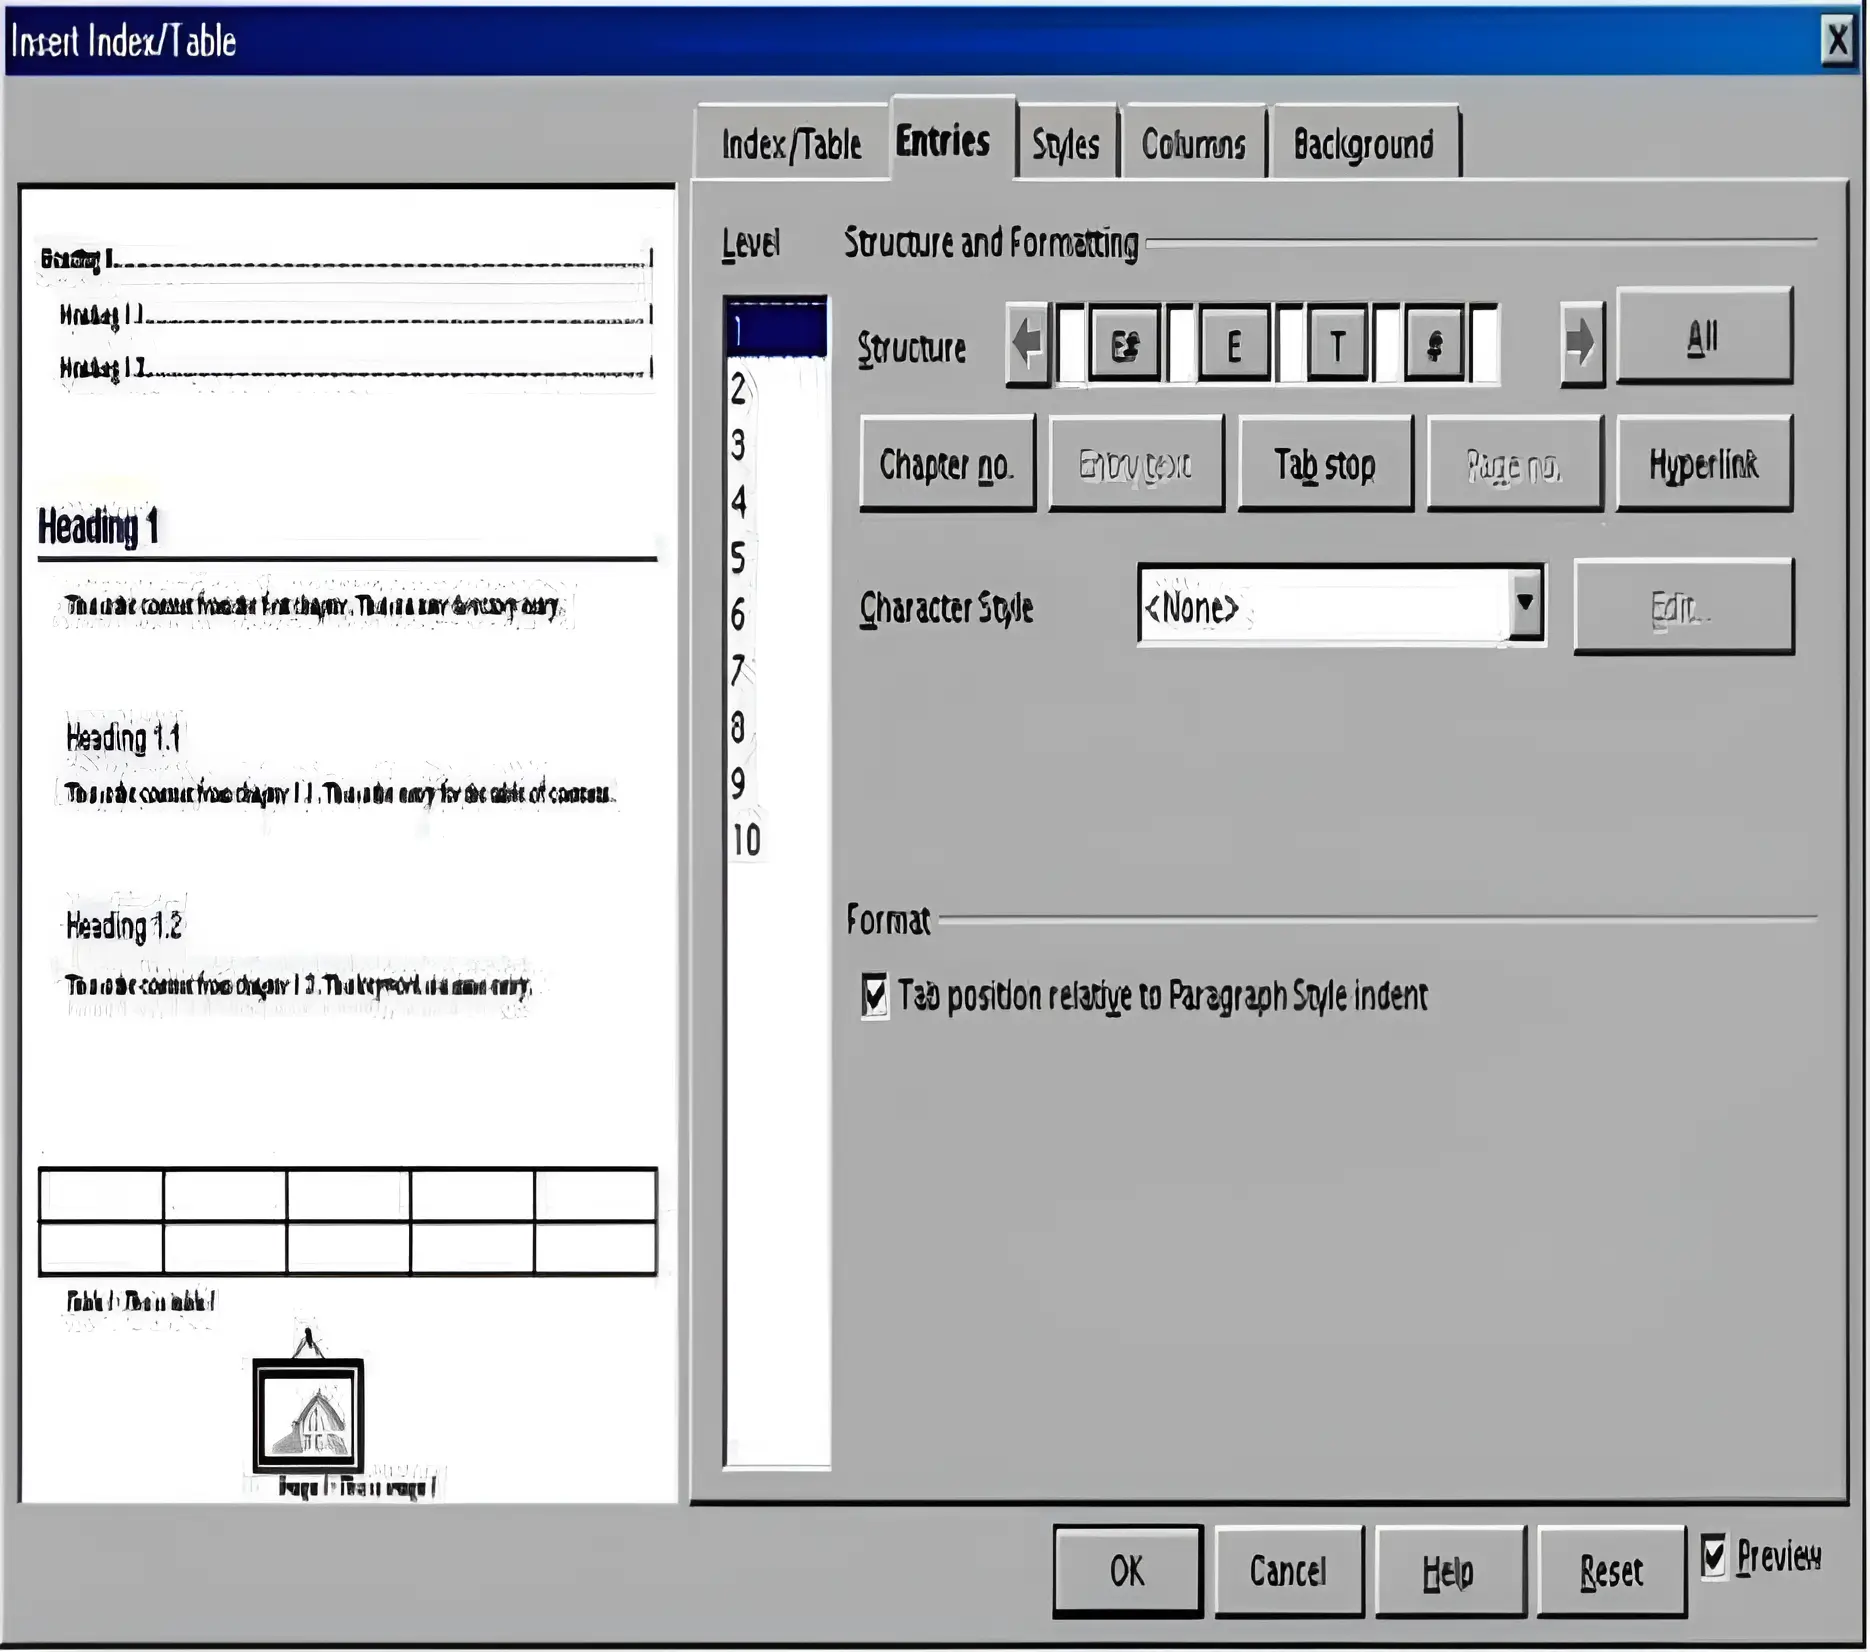
- E# – The chapter number is indicated by the E# button.
- E – The entered text is represented by the E button.
- T – A tab stop is represented by the T button.
- # – The page number is indicated by the # button.
- LS – The beginning of a hyperlink is indicated by the LS button. (This button is absent from the Structure line by default.)
- LE – A hyperlink’s conclusion is indicated by the LE button. (This button is absent from the Structure line by default.)
Deleting Elements
Click the button next to the element you want to remove from the Structure line, and then press the Delete key on your computer. For instance, click the T button and then press the Delete key to remove a tab stop.
Using The Background Tab
To add colour or a graphic to the table backdrop, use the Background tab.
Saving The Table Of Contents
Click OK to save the table of contents and have it display in your document. The table of contents is displayed in your document once the Insert Index/Table window closes.
Implement Mail Merge
Using a mail merge, you can personalise a letter you’ve already written and send it to a large group of recipients, giving the impression that you wrote it specifically for them. A mail merge can also be a rapid technique to create labels or envelopes with the addresses for various persons on each label or envelope using a list of people’s mailing addresses.
Anyone or any business that interacts frequently with customers, partners, parents, or other individuals must use the mail merge.
How to create Mail Merge in Digital Documentation
Step 1: Select starting document
Step 2: Select document type
Step 3: Insert address block or Selecting the data source
Step 4: Create salutation
Step 5: Adjust layout
Step 6: Edit document and insert extra fields
Step 7: Personalize documents
Step 8: Save, print or send
What is Data Source
During the mail merge process, data from another document referred to as the data source, Data Source connects to the main document and retrieves the information like names, addresses, and phone numbers can be found in a document, spreadsheet, or database that serves as the data source.
What are the different type of Data Source available in Mail Merge
OpenOffice.org allows data sources to be accessed and then linked into OOo documents. For example, a mail merge links an external document containing a list of names and addresses into a letter, with one copy of the letter being generated for each entry.
Different type of File which support to insert data in Mail merge are –
- Spreadsheet
- Text File
- Access or Base Database
- Address Book

