
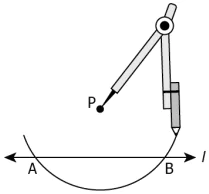
Question.7. A line segment \overline{PQ} is shown.Which of these options shows the correct steps to construct a copy of the line segment \overline{PQ}?
(a)
Step 1: Fix the compasses pointer at the mid-point of \overline{PQ}, say T, and the pencil end on Q.
Step 2: Draw any line m. Choose a point U on m. Without changing the compasses setting, place the pointer on U.
Step 3: Draw an arc that cuts m at a point, say V. Now \overline{UV} is the required line segment.
(b)
Step 1: Fix the compasses pointer on P and the pencil end on Q.
Step 2: Draw any line m. Choose a point U on m. Without changing the compasses setting, place the pointer on U.
Step 3: Draw an arc that cuts m at a point, say V. Now \overline{UV} is the required line segment.
(c)
Step 1: Fix the compasses pointer at the mid-point of \overline{PQ}, say T, and the pencil end on P.
Step 2: Draw any line m. Choose a point U on m. Without changing the compasses setting, place the pointer on U.
Step 3: Draw an arc that cuts m at a point, say Y.
Step 4: Fix the compasses pointer at the mid-point of \overline{UV}, say S, draw an arc that cuts m at a point, say V. Now \overline{UV} is the required line segment.
(d)
Step 1: Fix the compasses pointer on P and the pencil end on Q.
Step 2: Draw any line m. Choose a point U on m. Without changing the compasses setting, place the pointer on U.
Step 3: Draw an arc that cuts m at a point, say Y.
Step 4: Without changing the compasses setting, place the pointer on Y and draw an arc that cuts m at a point, say V. Now \overline{UV} is the required line segment.
Question.8. Richa constructs a line segment by following the given steps.
Step 1: Draw a line segment \overline{EF}.
Step 2: Draw a line l and mark a point G on it.
Step 3: Adjust the compasses up to the length of \overline{EF} and put the pointer of compasses at G to draw an arc intersecting the line l at H.
Step 4: Without changing the compasses setting and H as centre, draw an arc intersecting the line l at J.
Based on the information, which relation holds true?
(a) \overline{EF} = 2\overline{GH}
(b) \overline{GH} = 2\overline{GJ}
(c) 2\overline{EF} = \overline{GJ}
(d) 2\overline{GH} = \overline{HJ}
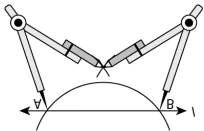
Question.11. The steps to construct a perpendicular to a line w through a point which does not lie on the line w are shown below.
Step 1: Mark point K outside the line w.
Step 2: Place a ruler along the edge opposite to the right angle of the set-square.
Step 3: Place a set-square on w such that one arm of its right angle aligns along w.
Step 4: Hold the ruler fixed. Slide the set-square along the ruler till the point K touches the other arm of the set-square.
Step 5: Join KL along the edge through K, meeting w at L.
Which two steps should be swapped so that the construction becomes possible?
(a) Step 2 and Step 4
(b) Step 3 and Step 4
(c) Step 2 and Step 3
(d) Step 3 and step 5
Question.12. The correct steps to construct a perpendicular to a line through a point not on it are as shown.
Step 1: 
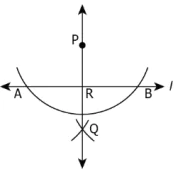
Which of these conditions is sufficient to justify the construction?
(a) \overline{PA} = \overline{PB}
(b) \overline{PA} = \overline{PB} = \overline{BQ}
(c) \overline{PA} = \overline{PB} = \overline{BQ} = \overline{AQ}
(d) \overline{PA} = \overline{PB} = \overline{BQ} = \overline{AQ} = \overline{PR}
Question.13. Consider the line segment.Which of these options correctly shows the complete steps to construct an angle of measure 50° using protractor?
(a) 


Question.14. A teacher asks her students to join the alphabets such that the resulting angle is 30°.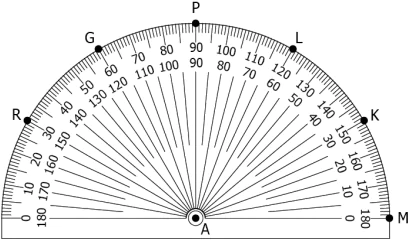
Ujjwal: Joins AR and AM
Satyam: Joins AM and AK
Abhishek: Joins AP and AL
Virendra: Joins AP and AG
How many of them responded correctly?
(a) None
(b) Only one student
(c) Only two students
(d) Only three students
Ans.13. (b)
Question.15. A teacher draws \angle AOB as shown and asks his students to write the steps in order to construct the copy of the given angle.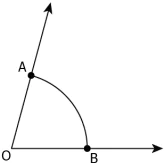
Student 1:
- Step 1: Draw a line l and mark a point P on it.
- Step 2: Place the compasses at O and set the compass to length OA.
- Step 3: Using the same compasses setting and with P as centre, draw an arc cutting l in Q.
- Step 4: Set the compasses to the length AB and with Q as centre, draw an arc intersecting the arc drawn in Step 3 at R.
- Step 5: Join PR to get \angle O = \angle P.
Student 2:
- Step 1: Draw a line l and mark a point P on it.
- Step 2: Place the compasses at A and set the compass to length AB.
- Step 3: Using the same compasses setting and with P as centre, draw an arc cutting l in Q.
- Step 4: Set the compasses to the length OB and with Q as centre, draw an arc intersecting the arc drawn in Step 3 at R.
- Step 5: Join PR to get \angle O = \angle P.
Who among them is/are correct?
(a) Only Student 1
(b) Only Student 2
(c) Both Student 1 and Student 2
(d) Neither Student 1 nor Student 2
Question.16. Consider \angle A as shown.
- Step 1: Draw a line l and mark a point M on it.
- Step 2: Place the compasses at A and draw an arc to cut the rays of \angle A at B and C.
- Step 3: Using the same radius used in Step 2 and with M as centre, draw an arc cutting l in N.
- Step 4: Taking radius equal to AB and N as the centre, draw an arc intersecting the arc drawn in Step 3 at P.
- Step 5: Join M to P to get \angle A = \angle M.
In which step did the student make the first error and what should be the correct step?
(a) Step 3: Using the smaller radius than that of used in Step 2 and with M as centre, draw an arc cutting l in N.
(b) Step 3: Using the greater radius than that of used in Step 2 and with M as centre, draw an arc cutting l in N.
(c) Step 4: Taking radius equal to BC and N as the centre, draw an arc intersecting the arc drawn in Step 3 at P.
(d) Step 4: Taking radius equal to AC and N as the centre, draw an arc intersecting the arc drawn in Step 3 at P.
Question.17. Part of construction of an angle measuring 45° is shown below.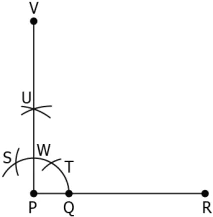
(a)
Step 1: Taking the radius greater than \frac{WQ}{2} and with centres P and Q, draw two arcs which cut each other at a point X.
Step 2: Join PX to get \angle RPX = 45°.
(b)
Step 1: Taking the radius less than \frac{WQ}{2} and with centres P and Q, draw two arcs which cut each other at a point X.
Step 2: Join PX to get \angle RPX = 45°.
(c)
Step 1: Taking the radius greater than \frac{WQ}{2} and with centres W and Q, draw two arc which cuts each other at a point X.
Step 2: Join PX to get \angle RPX = 45°.
(d)
Step 1: Taking the radius less than \frac{WQ}{2} and with centres W and Q, draw two arcs which cuts each other at a point X.
Step 2: Join PX to get \angle RPX = 45°.
Question.18. Consider an angle shown below.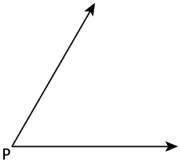
Step 1: With P as centre and a convenient radius, draw an arc that cuts both rays of \angle P. Label the points of intersection as Q and R.
Step 2: With Q as centre, draw (in the interior of \angle P) an arc with radius greater than half the length QR.
Step 3: With twice the radius used in Step 2 and with R as centre, draw another arc in the interior of \angle P.
Let the two arcs intersect at S. Then PS is the required bisector of \angle P.
Which step in the given construction is incorrect and what should be the correct step?
(a) Step 2: With Q as centre, draw (in the interior of \angle P) an arc whose radius is smaller than half the length \overline{QR}.
(b) Step 3: With the same radius as used in Step 2 and with R as centre, draw another arc in the interior of \angle P. Let the two arcs intersect at S. Then \overline{PS} is the required bisector of \angle P.
(c) Step 2: With Q as centre, draw (in the interior of \angle P) an arc whose radius is equal to the length \overline{QR}.
(d) Step 3: With the smaller radius than that used in Step 2 and with R as centre, draw another arc in the interior of \angle P. Let the two arcs intersect at S. Then \overline{PS} is the required bisector of \angle P.
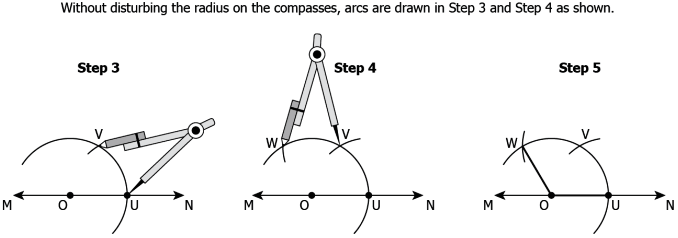
Question.19. The first two steps to construct an angle of measure 120° are as shown.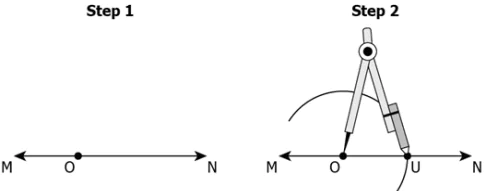
(a) 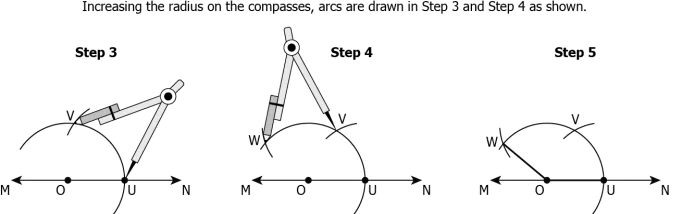
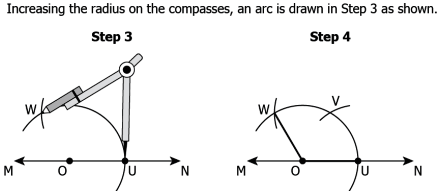
Question.20. A student wrote the following steps to construct an angle of measure 90°.
- Step 1: Draw a line segment \overline{OB}.
- Step 2: With O as centre, draw an arc intersecting \overline{OB} at P.
- Step 3: Taking the radius greater than that of used in Step 2 and with P as the centre, draw an arc intersecting the arc drawn in Step 2 at D.
- Step 4: Taking the radius greater than that of used in Step 3 and with D as the centre, draw an arc intersecting the arc drawn in Step 2 at E.
- Step 5: Taking the same radius used in Step 4 and with D and E as centres, draw two arcs intersecting each other at a point, say F.
- Step 6: Join OF to form \angle BOF = 90°.
In which step did the student make the first error and what should be the correct step?
(a) Step 3: Taking the same radius used in Step 2 and with P as the centre, draw an arc intersecting the arc drawn in Step 2 at D.
(b) Step 3: Taking the radius smaller than that of used in Step 2 and with P as the centre, draw an arc intersecting the arc drawn in Step 2 at D.
(c) Step 4: Taking the same radius used in Step 3 and with D as the centre, draw an arc intersecting the arc drawn in Step 2 at E.
(d) Step 4: Taking the smaller than that of used in Step 3 and with D as the centre, draw an arc intersecting the arc drawn in Step 2 at E.
Ans.19. (c)


